

User focused ideas for a new Airline Mobile Application
This project was finished as an assignment for my Professional Diploma in UX Design from UXDI
What follows is a showcase of my design and research method that ultimately ended in a successful medium fidelity prototype
8 minute read time

-

The Problem
Airline apps can be overwhelming and confusing.
The FLY UX App will address these
problems and be an easy to use experience for it's users. -

My Role
I was the sole researcher and designer for this project.
Although I did direct some collaboration events to collect ideas and insights about airline mobile applications. -

The Goals
Using user focused design:
Create an flight booking process that is easy to understand and easy to use.
The Task
The project task was weighted towards improving the flight booking process of airline applications on handheld devices.
This process begins on the landing page and ends when the user has paid for their tickets.
The Process
For this project I carefully followed the Research > Analysis > Design > Prototyping > Wireframes process.
I will lay out some key moments and methods where I feel I made this project my own.
This way readers will get an insight into how I think and how I approach a project of this size.

Step 1 : Research, research, research.
Research is of course the most important step in this process.
I wanted to design something that fixed the current user problems that were prevalent in airline design apps.
To do this I conducted customer surveys, built competitive bench-marking reviews of popular airlines apps as well as multiple user studies.
This allowed me to create a bank of insights that I can use to define problems and aid me to create a comprehensive user friendly design.
This video is an example of one of the user tests I conducted. This video is 56 minutes long.
These two images show an example of one of the competitive benchmark reviews I made, in this case the Ryanair app.
Step 2 : Analyse This Analyse That
Using the qualitative data I obtained from the research stage I moved on to the analyse stage.
This stage was about making sense of the information I had accumulated.
Taking the insights gathered I conducted some online collaboration sessions.
These ranged from building affinity diagrams, whiteboard sketching and open discussions.
In these sessions, we discussed each insight and grouped them into categories.
It also allowed us to see areas that I may have missed or didn’t cover as well.
This meant I could jump back into the research phase and redraft a new survey to fill some of these areas.
This stage resulted in my qualitative data gaining some more structure and allowed me to continue the design process.

1.1 Online Collaboration Session with the
1.2 Example of an affinity diagram
Pictured: (1.1 ) The insights from the research stage (1.2) The insights organised into groups as the appear in the flight booking process. Link to Miro Board Here
Building on these more structured insights I decided to laser focus on the user and build a Customer Journey Chart.
One of my affinity charts was based on the booking process and I categorized each insight into a box that represented a step in that booking process.
This allowed us to see the high level important areas that either a user found easy or found difficult.
With this information I built a Customer Journey Chart which gave viewers a visual representation of a customer going through a booking process.
With each section detailing the Goals of the customer, Common Behaviors, Context, Known Pain Points and Positives.
Taking into account all the data that we had collected and organizing it into a meaningful linear user focused diagram helped to visualize the end goal of this project and helped understand the all important mind set of the average user.
1.3 Customer Journey Chart - Click to enlarge
STEP 3: Design Time
With the previous research on user requirements, the notes on competitive apps and following the user journey as a guide.
This flow diagram would be the start of my design and allow myself to start thinking about how the FLYUX booking process would work in detail.
I started sketching out a flow diagram ideas on to paper.
This allowed me to view each of the steps independently and get more insight of what’s expected from the user at each step.
After I was happy with the sketches I recreated them to a digital format using Figma and exported it as a PDF.

Some sketches of my flow diagrams.

I designed two flowcharts for the booking process.
The first one is the standard booking process and would be for first time users of the application.
But I believed FLYUX would make smart automatic decisions based on the previous bookings and choices of the user.
For example if a user likes to sit in an aisle seat they most likely would prefer an aisle seat every time. They might also prefer flying in the evening every time, certain fares and baggage choices would also be repeated.
With this in mind I sought to create a flow where previous decisions are remembered and then automatically chosen and then displayed to the user for review and/edit.
This would greatly cut down the amount of interactions and time spent on a booking.

A flow chart for a standard booking a flight process. Click to enlarge and open a new window.

Flowchart for the returning user flow chart aka ‘EZ Book.’ Click to enlarge and open a new window.
In the initial booking process we had a total of 51 interactions to complete the goal of booking a flight.
With the smart automatic decision making of the EZ Book option those interactions can seemingly be reduced to around 15 interactions.
Quite a considerable difference,
It was at this stage I decided the EZ Book function would be a worthwhile feature to attain for the FLY UX app.


Before we moved into making a working prototype we needed to test out the flow chart in a way that was quick and effective.
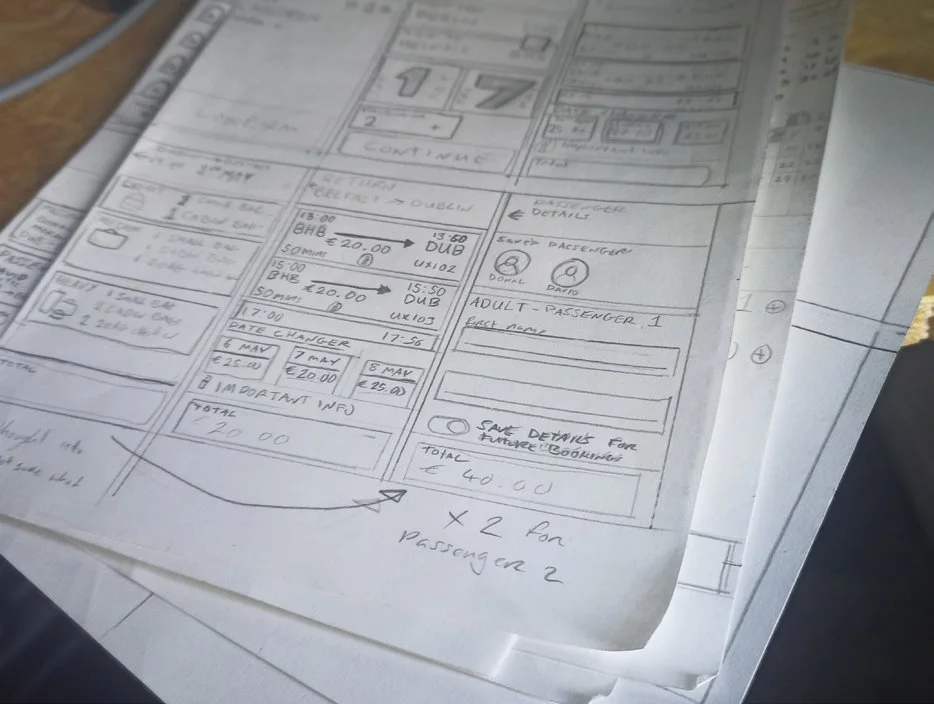
So I started sketching out the separate screens how I saw them in my mind’s eye on to paper.
I then cut them out and made a handy paper prototype of the product.
This would help me flesh out the ideas I had in the flow chart as well as have a handy paper tool that I could use for testing the product.
Although a small prototype is something I could have easily put together on Adobe XD I decided that this extra step might lead to some ideas.
When I handed the pile of sketches to people to flip through and test themselves, I noticed they found the handheld paper prototype quite charming.
I believed this could have led to a higher engagement level and perhaps allowed them to share ideas more freely as the design looks less finalized then it would as a digital artifact.


Step 4: Prototype
At this stage it was time to start building a medium fidelity prototype of the FLYUX app.
The prototype would be focused on the main flow of the app in this case booking a flight.
Having the main flow in a medium fidelity prototype would allow me to complete another round of testing and also give me the chance to test out some other aspects that I haven’t had a chance till now.
Although a medium fidelity prototype, I wanted the finished project to showcase some of the visual design choices I’ve been creating for FLYUX.
I felt this prototype would be a good time to test those aesthetic designs with users.

Work board A: some of the elements designed for the prototype

Work board A: some of the elements designed for the prototype
Happy with the prototype I uploaded it to the web and started sharing it with willing testers.
The testing process was interesting as some people do appear to be frustrated when not everything is clickable.
Despite the fact that I informed them beforehand.
I found that if I made their booking goal clear at the start and asked them to remember their flight dates and booking requirements they had a much more positive experience.
I felt this was true to a natural experience as well as a user would have ideal flight dates and requirements in their head or written down before booking.
The testing allowed me to see some mistakes in the prototype such as broken ‘back’ buttons but overall I didn’t have to change much as the result was mostly positive.
I’ve felt I have been able to demonstrate the Main Flow and the alternative EZ BOOK flow well enough that I was able to get accurate testing results after I subjected testers to them.
With positive results from users on both flows I can happily say I believe the medium fidelity prototypes to be somewhat of a success.
Conclusion
If you have made it this far allow me to thank you for your time.
I hope this project gave you some insight to how I design and how I think about approaching a project.
The FLY UX project was a great educational experience.
I have also included a wireframe document for FLY UX which would be handed to developer if it were to be built.
If you would like to see any other documentations from this project please just ask and I’ll be more then happy to provide it.